
If you want to add a touch of nature to your home decor, painting flowers on your walls is a great way to do it. It’s not as complicated as you might think, but it can also be fun. All it takes is some basic painting supplies and a bit of creativity to transform your walls into a beautiful garden. In this blog post, we’ll walk you through the steps of how to paint flowers on the wall – perfect for beginners!

Can You Paint Flowers on The Wall?
Adding a touch of floral design to your walls can immediately brighten up any room. But can you paint them yourself? The answer is yes! With a bit of patience, creativity, and a steady hand, you can bring any floral pattern to life on your walls. Choose a color scheme that complements the rest of the room, and select a variety of flowers to add depth and texture to your design. You don’t have to be an artist to create beautiful floral wall patterns – just let your imagination run wild!
Why Should You Paint Flowers on The Wall?
Flowers have long been a symbol of beauty, love, and growth, making them a perfect addition to any wall in your home. Not only do they bring a sense of life and vibrancy to any space, but they also have a calming effect on our senses, making us feel more relaxed and at ease. Whether you choose a realistic representation or an abstract interpretation, painting flowers on the wall adds a unique touch of creativity to any room.
Plus, with an endless array of colors, sizes, and species, the possibilities for designing a one-of-a-kind floral wall are endless. So go ahead and take the plunge by painting some flowers on your wall, and watch as your space blooms with new life and energy.
How to Choose the Right Paint Colors
Choosing the right paint colors is crucial for creating a beautiful flower mural on your wall. Here are some tips to help you choose the perfect shades:
Consider the Overall Theme and Style of Your Room.
The first step in choosing paint colors is to consider the overall theme and style of your room. If it’s a modern, minimalist space, you may want to stick with neutral shades like whites, greys, and blacks. If your room has a more bohemian or eclectic feel, you can experiment with bolder colors and patterns.
Look for Inspiration in Nature.
Nature is an endless source of inspiration when it comes to choosing paint colors for your flower mural. Take a walk outside and observe the colors around you – notice how different flowers and plants complement each other. You can also browse through magazines or visit a local flower garden for ideas.
Use Color Theory to Guide Your Choices.
Color theory is the science behind how colors interact with each other, and it can be helpful when choosing paint colors for your mural. Complementary colors (colors opposite on the color wheel) create contrast and make each other pop, while analogous colors (colors next to each other on the color wheel) create a harmonious and soothing effect.
Take Into Account Lighting in Your Room.
The lighting in your room can greatly affect how paint colors appear. If you have a lot of natural light, bold and vibrant colors may look even more intense. On the other hand, if your room has limited natural light, you may want to go for lighter and brighter shades to make the space feel more open and airy.
Consider the Size of Your Wall.
The size of your wall can also play a role in choosing paint colors. If you have a smaller wall, bold and dark colors may make the space feel even more cramped. On the other hand, if you have a larger wall, you have more room to play with different colors and create a more intricate flower design.
Don’t Be Afraid to Mix and Match.
When it comes to painting flowers on your wall, don’t feel limited to using just one or two colors. You can create a more dynamic and visually appealing mural by incorporating multiple shades of the same color or using complementary colors for different flower designs. Just make sure to balance out the colors and avoid overwhelming your wall with too many contrasting shades.
Preparing Your Wall for Painting
Now that you have chosen your paint colors, it’s time to prepare your wall for painting. Here are some steps you can follow:
Clean the Wall Thoroughly.
Before starting to paint, make sure your wall is clean and free of any dust, dirt, or oil. Use a damp cloth to wipe down the surface and let it dry completely before moving on to the next step.
Fill in Any Holes or Imperfections.
If your wall has any holes, cracks, or imperfections, fill them in with spackling paste and let it dry. Once dried, sand down the area until it’s smooth and even with the rest of the wall.
Sand Down Any Rough Areas.
If your wall has a textured surface, using a sander can help create a smoother canvas for painting. Be sure to wear protective gear and sand in one direction to avoid creating swirls or uneven patches on the wall.
Prime the Wall if Necessary.
Depending on the condition of your wall and the type of paint you are using, priming may be necessary to ensure better coverage and adhesion. Consult with a paint specialist or follow the instructions on your paint can to determine if priming is needed.
What Materials Do I Need to Paint Flowers on The Wall?
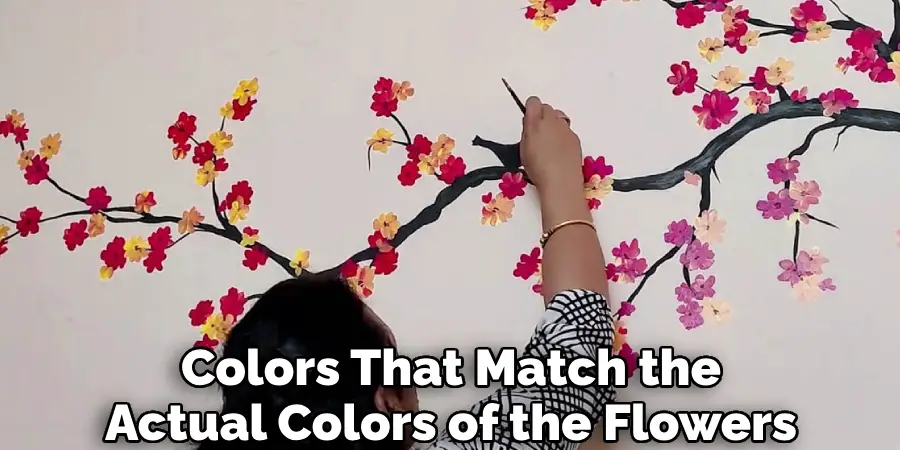
Are you looking to add a touch of nature to your home décor? Painting flowers on your wall could be just what you need! To get started, you’ll need a few basic materials. First, you’ll need to paint in the colors of your choice. For the flowers, you’ll want to choose colors that match the actual colors of the flowers you want to paint. You’ll also need painter’s tape to create clean lines and prevent any bleeding between colors.
A set of paint brushes in various sizes will also be helpful in creating the different shapes and details of the flowers. Don’t forget a drop cloth or old sheet to protect your floors and furniture from any accidental paint drips. With these materials on hand, you’ll be ready to unleash your inner artist and create a beautiful floral masterpiece on your wall.
How To Paint Flowers On The Wall: A Beginner’s Guide
Step 1: Choose Your Colors and Flowers.
Before you jump into the painting, take some time to decide what flowers you want to paint and what colors you want to use. Look online or at floral design books for inspiration. Pick colors you would find in nature to achieve a natural look. So, if you’re painting a daisy, you might choose white and yellow. If you’re painting a rose, you might choose red and green.
Step 2: Prepare Your Surface.
Painting on a smooth surface helps your paint coat better and last longer. Fill any dents or holes and sand down any rough patches on your wall. Use a damp cloth to clean the wall surface as well. This will remove all dust, dirt, and grime before you start to paint.
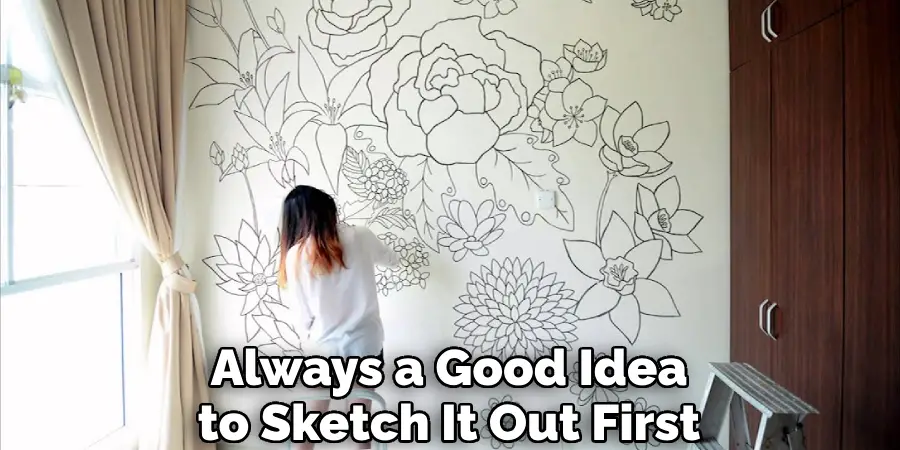
Step 3: Sketch Your Flowers.
Use a pencil to sketch your flowers on the wall. You can print templates or use stencils if you’re uncomfortably free-handling your design. Starting with a pencil will allow you to make mistakes that you can easily erase without damaging the painted surface.
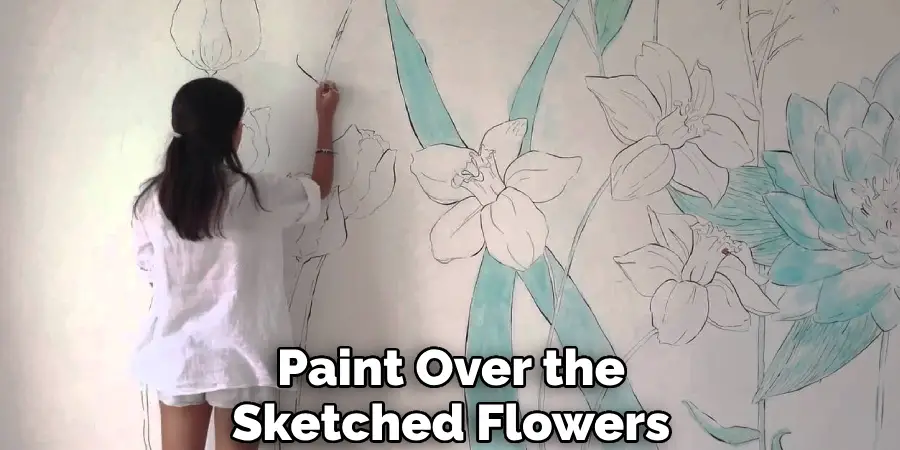
Step 4: Paint the Base Coat.
Choose your base color and paint over the sketched flowers. This layer will serve as the background or the base of your design. Use a small roller or paintbrush to apply the paint carefully and wait for it to dry before layering the next color.
Step 5: Add Detail to The Flowers.
After the base coat has dried, it’s time to paint the details of your flowers. Start with the outermost petals and work inward, adding depth and highlighting areas with lighter shades. You can blend colors together at this stage to achieve a more realistic finish. Be patient and take your time with each stroke.
Step 6: Touch-Ups and Finishing.
Once your flowers are complete, step back and look at your work. Touch up any imperfections, and then let it dry. You can then apply a clear coat or sealer to protect your design and extend its lifespan. The clear coat will help your painted flowers withstand daily wear and tear and make the colors pop beautifully too. Your flower-painted wall is now ready to enjoy.
Step 7: Rejoice!
Your hard work has finally paid off, and you can now admire your beautiful flower-painted wall. Enjoy the beauty of nature inside your home, and bask in the compliments from friends and family. With a little bit of time and effort, you’ve painted a stunning piece of art that will bring joy to your home for years to come.
That’s it! You’ve now learned how to paint flowers on the wall. With these seven steps, you’ll be sure to create a lasting masterpiece in no time. So go ahead and start painting! You won’t regret it.
5 Considerations Things When You Need to Paint Flowers on The Wall
1. Sketch It out First
When you’re painting a flower on the wall, it’s always a good idea to sketch it out first. This way, you can get an idea of the size and shape of the flower, and you can also experiment with different color combinations. Once you’re happy with your sketch, you can start painting.
2. Choose the Right Colors
When choosing colors for your flower painting, it’s important to consider the room’s overall color scheme. You want the colors of your flower to compliment the other colors in the room, not clash with them. Additionally, you’ll want to choose colors that are appropriate for the type of flower you’re painting. For example, roses are typically red or pink, while daisies are usually yellow or white.
3. Use Multiple Layers
When painting a flower, it’s important to use multiple layers of paint. This will give your flower more depth and dimension, and it will also make it more realistic. Start with a light base color, then add darker shades in the middle and lighter shades around the edges.
4. Paint the Petals Individually
One mistake many people make when painting flowers is painting all the petals at once. Instead, you should paint each petal individually. This will define each petal more and make your flower look more realistic.
5. Add Some Finishing Touches
Once you’ve finished painting your flower, you can add some finishing touches to really make it pop. You can add highlights by using a lighter shade of paint, or you can add shadows by using a darker shade. You can also add texture using a brush with different bristles or glitter or sequins. There are lots of ways to make your flower painting unique and special!
By following these five considerations when you need to paint flowers on the wall, you can create a beautiful piece of art that will add color and beauty to any room. With patience and practice, you’ll be able to master the art of painting flowers in no time!
Benefits of Paint Flowers on The Wall
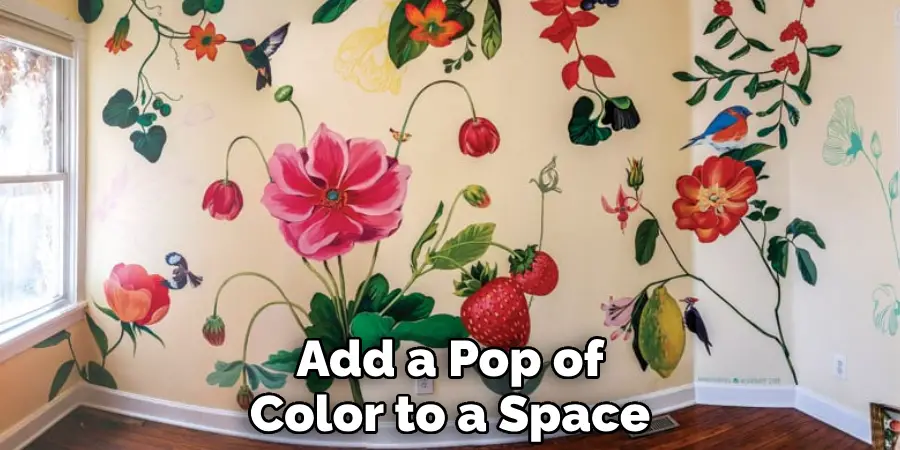
Painting flowers on the wall can do more than just add a pop of color to a space. It can create a sense of serenity and bring a bit of nature inside. Whether you go big with a mural or keep it simple with a few smaller blooms, these painted flowers can add charm to any room. Not only are they aesthetically pleasing, but they can also help to boost your mood and reduce stress levels. Plus, painting flowers on the wall is a great DIY project that can save money and make your space more personalized. So, if you’re looking to add a touch of beauty and tranquility to your home, consider painting flowers on your walls.
Some Common Mistakes People Make When Trying to Paint Flowers on The Wall
When it comes to painting flowers on the wall, many people often find themselves struggling and making common mistakes. This can be frustrating for beginners who are just starting out with this type of artwork. To help you avoid these mistakes, here are some of the most common ones that people make when trying to paint flowers on the wall:
Not preparing the surface properly:
Preparing the surface before painting is crucial for achieving a smooth and beautiful finish. Many people skip this step and start painting directly on the wall without cleaning or priming it first. This can result in an uneven surface, making it difficult to create detailed flower designs.
Choosing the wrong type of paint:
Using the wrong type of paint can also lead to problems when painting flowers on the wall. For example, using oil-based paint can cause the colors to bleed and make it challenging to achieve clean lines and details. It’s essential to use acrylic or latex paint, which is specifically designed for indoor walls.
Skipping sketching and planning:
Many people think they can start painting without any prior planning or sketching. However, this can result in a messy and uncoordinated design. It’s essential to sketch out your flower designs on paper first, make any necessary adjustments, and then transfer them onto the wall with light pencil marks.
Not using the right tools:
Having the right tools is crucial for creating detailed and precise flower designs on the wall. Using low-quality brushes or not having the right brush size can make it challenging to create small details and achieve a polished look.
Not blending colors properly:
Blending colors is essential when painting flowers on the wall. Many people tend to use too much paint or not mix them correctly, resulting in harsh and unnatural-looking colors. It’s crucial to blend your colors carefully to achieve a more realistic and pleasing appearance.
Not taking breaks:
Painting a detailed flower design on a wall can be time-consuming and tiring. Many people make the mistake of not taking breaks, which can lead to fatigue and sloppy work. It’s essential to take short breaks and step back from your painting regularly so you can come back with fresh eyes and make the necessary adjustments.
Not experimenting with different techniques:
Lastly, not exploring and trying out different techniques can limit your creativity and result in similar-looking flowers on the wall. Don’t be afraid to experiment with different brush strokes, blending techniques, and color combinations to create unique and beautiful flower designs.
By avoiding these common mistakes, you can achieve a more professional and polished look when painting flowers on the wall. Remember to prepare your surface properly, use the right tools and techniques, and take breaks when needed.
Additional Tips for Painting Flowers on The Wall
Now that we’ve covered some of the common mistakes to avoid when painting flowers on the wall, here are some additional tips to help you achieve even better results:
- Use a ruler or measuring tape to ensure your design is symmetrical and evenly spaced.
- Experiment with different brush sizes and shapes to create different petal and leaf textures.
- Consider using stencils or templates for more intricate designs, especially if you’re a beginner.
- Don’t be afraid to mix colors to create your own unique shades and hues.
- Use a light touch when painting thin lines or small details, as pressing too hard can result in uneven lines and smudges.
- Practice on a small area first before painting the entire wall to get a feel for the brush and paint.
- Have fun and let your creativity flow – there’s no right or wrong way to paint flowers on the wall. So embrace mistakes and use them as opportunities to try new techniques!
With these tips in mind, you can take your flower painting skills to the next level and create beautiful and personalized flower designs on your walls.
Conclusion
Painting flowers on the wall is a simple and rewarding DIY project that anyone can do. You don’t need to be an artist or have any special skills to create a beautiful floral design. You can create a stunning and personalized wall in your home with basic supplies, a little time, and patience. Hopefully, these steps have helped you get started, and we can’t wait to see what you create. Thanks for reading our post about how to paint flowers on the wall.