

Soundproof foam, a specialized material designed to reduce noise pollution, is an essential component for creating serene, distraction-free environments. Its benefits range from enhancing privacy to improving sleep quality and concentration, making it a go-to solution for homes, studios, and offices alike.
Understanding your specific soundproofing needs is crucial; it involves choosing between absorption materials that minimize sound reflections or isolation materials that block sound from entering or leaving a space.
Furthermore, considering the Noise Reduction Coefficient (NRC) of the foam can guide you in selecting the most effective type. Before learning how to install soundproof foam, setting realistic expectations about the level of sound reduction achievable is vital, to ensuring satisfaction with the outcome of your soundproofing project.
Planning and Preparation for Installation
Choosing the Right Soundproof Foam
- Material: The primary materials used in soundproof foam are Polyurethane and Melamine. Polyurethane is widely available and cost-effective, making it a popular choice for general soundproofing needs. Melamine, on the other hand, offers superior fire resistance and acoustic properties but at a higher cost.
- Thickness: Thickness plays a critical role in the foam’s sound absorption capabilities. Generally, thicker foam provides better soundproofing, but the ideal thickness will depend on the specific needs of your space and the frequency of noise you’re trying to mitigate.
- Profile: The surface profile of the foam, such as Wedge, Beveled, or Pyramid shapes, can impact its sound absorption efficiency. Wedge and pyramid profiles are effective at catching and diffusing sound waves, making them ideal for high-traffic areas or environments where sound clarity is essential. Beveled foam, with its smoother appearance, is well-suited for areas where aesthetics are a priority alongside sound management.
Measuring Your Space and Calculating Foam Needs
Before purchasing your soundproof foam, accurately measuring the space where it will be applied is essential. This step ensures you buy the right amount of foam, preventing wastage or the need for additional purchases. Start by measuring the height and width of the walls, and remember to subtract the space taken by windows or doors. After obtaining the total square footage, consider ordering an extra 10% of the material to account for cutting and fitting. This proactive approach guarantees that you have enough foam to cover your space effectively, allowing for a more seamless and efficient installation process.
Tools and Materials You’ll Need
Before beginning the installation of your soundproof foam, gathering the right tools and materials will streamline the process, ensuring efficiency and success. Here’s a breakdown of what you’ll need:
Essential Tools:
- Utility Knife: This is for precise cutting and shaping of the foam panels to fit your space perfectly.
- Level: Ensures your foam panels are perfectly aligned for optimal soundproofing effectiveness.
- Tape Measure: For accurate measurements of your space, ensure you cut your foam panels to the correct size.
Optional Tools:
- Stud Finder: Useful in identifying stud locations if you’re attaching panels directly to wall studs.
- Spray Bottle: If using a water-activated adhesive, a spray bottle will be needed to activate the glue before application.
Choosing the Right Adhesive:
- Spray Adhesive: Offers easy application and is excellent for a variety of surfaces. Ensure it’s compatible with both your wall and the foam type.
- Glue: For a more permanent solution, specific acoustic foam glue exists, which provides a stronger bond.
- Command Strips: An ideal no-damage option for renters, allowing for easy removal without harming the wall surface.
Preparing Your Walls (for permanent installations)
Before initiating the installation process, preparing your walls can significantly impact the effectiveness and longevity of the soundproof foam. Follow these steps to ensure a surface conducive to a strong bond:
- Cleaning the Surface: Begin by cleaning the walls where the foam will be installed. Remove dust, dirt, and grime with a mild detergent and water. Ensure the walls are completely dry before proceeding. This step is crucial for the adhesive to stick properly.
- Addressing Uneven Surfaces (optional): If your walls have noticeable uneven spots, consider smoothing them out. Small imperfections can be filled with spackle and sanded down. For more significant irregularities, you might need to install a thin layer of drywall. This step isn’t absolutely necessary but can improve the soundproofing performance.
How to Install Soundproof Foam: Installation Methods (Permanent Installations)
Using Spray Adhesive
Safety Precautions
When using spray adhesive, safety should be your top priority. Ensure the room is well-ventilated, open windows, and use fans to circulate air. Wear protective gloves and a respirator mask to avoid inhaling fumes. Avoid direct contact with the skin and eyes, and always follow the manufacturer’s instructions for use.
Applying the Adhesive
Shake the can well before use. Hold it approximately 6 to 8 inches away from the surface you’re applying it to. Apply a thin, even layer of adhesive to both the wall and the back of the foam panel. Wait for the adhesive to become tacky—usually about 30 seconds—before attaching the foam to the wall.
Placing the Foam Panels
Carefully align the foam panel with the intended area on the wall. Press the foam firmly in place, starting from one corner and smoothing out any air bubbles as you go. For larger panels, it may be helpful to have an extra pair of hands to ensure even placement and pressure. Give the adhesive enough time to cure according to the manufacturer’s instructions, usually 24 hours, before fully evaluating the effectiveness of the installation.
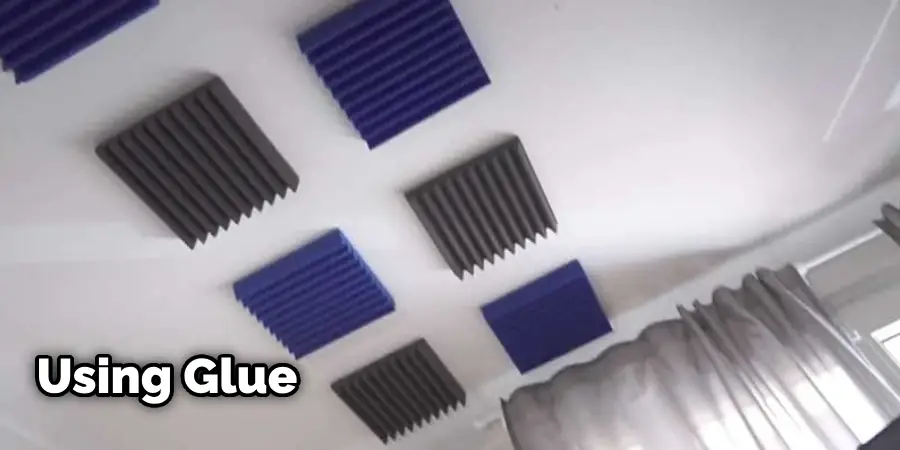
Using Glue
Choosing the right adhesive glue is crucial when looking for a more permanent and robust solution for installing soundproof foam. Select a glue that is designed specifically for acoustic foam and compatible with your wall material. This ensures a durable bond that will stand the test of time.
Choosing the Right Glue
When selecting glue, look for products labeled as “acoustic foam glue” or similar. These are formulated to adhere foam to various surfaces without damaging the foam’s structure or affecting its sound-absorbing properties. Always check the glue’s compatibility with both the foam and the wall surface you intend to use it on.
Applying the Glue
Apply the glue to the back of the foam panel in a uniform layer, covering the entire surface to ensure strong adhesion. Some glues might require you to apply them to both the wall and the foam panel; refer to the glue’s instructions to be sure. Wait for the glue to become tacky if directed by the product instructions. This waiting period can vary, so following the specific recommendations of the glue manufacturer is important.
Securing the Foam Panels
Once the glue is tacky, press the foam panel against the wall in the desired location. Apply pressure uniformly across the panel to ensure all areas bond well with the wall. It might be helpful to use a roller to press out any air bubbles and to ensure the foam is perfectly flat against the wall. Allow the glue to cure for the recommended time before testing the soundproofing effectiveness. This waiting period is crucial for achieving the strongest bond and optimal soundproofing results.
How to Install Soundproof Foam: Temporary Installations
Using Command Strips
Choosing the Right Command Strips
Selecting the appropriate Command Strips is essential for temporary installations of soundproof foam. Opt for strips that can support the weight of your panels and are specifically designed for use on walls to avoid damage upon removal. It’s also important to choose strips that can be removed cleanly, maintaining the integrity of both the wall and the foam panel.
Attaching the Strips to the Foam Panels
Begin by placing the strips on a clean, flat surface and pressing the foam panel onto the strips to ensure strong adhesion. Typically, four strips per panel—one at each corner—should suffice, but additional strips should be used for larger panels to distribute the weight evenly. Press firmly across the entire surface of the strip for about 30 seconds to enhance the bond.
Hanging the Foam Panels
Once the strips are securely attached to the back of the foam panel, it’s time to position them on the wall. Before removal of the strip’s backing, plan out the arrangement of your panels to ensure optimal soundproofing and aesthetic appeal. Peel the backing off and carefully place the panel against the wall in the desired location. Press firmly over the areas where the strips are for about 30 seconds to secure the panel in place. This method allows for easy repositioning and removal without damaging the walls.
Finishing Touches
Addressing Gaps and Seams (optional)
After installing the soundproof foam, you may notice small gaps or seams between panels. These can slightly undermine the effectiveness of your soundproofing. To address this issue, consider using the acoustic sealant. This flexible, paintable product can fill in those spaces, ensuring a seamless and more aesthetically pleasing finish. Ensure the sealant is compatible with your foam to avoid any damage or reduction in soundproofing capabilities.
Hiding Imperfections with Fabric Panels (optional)
If you’re looking for a way to conceal any imperfections or simply enhance the visual appeal of your soundproofed room, fabric panels can be an excellent option. Choose a breathable fabric that doesn’t hinder the acoustic properties of the foam. You can either create frames for the fabric, stretch it around, and attach it directly over the foam or hang it loosely like a curtain for easy removal and access to the foam panels beneath. This solution adds a decorative touch while maintaining the room’s sound integrity.
Advanced Installation Techniques (Optional)
Creating Bass Traps
Bass traps are crucial for managing low-frequency sounds in any space dedicated to audio precision. These specialized sound absorption devices are typically placed in corners, where bass frequencies tend to accumulate and create undesired reverberations. To create an effective bass trap, choose materials that are dense and capable of absorbing lower frequencies, such as thick acoustic foam or mineral wool. Measure the corner of your room accurately to ensure your bass trap fits snugly. For a DIY approach, construct a frame to hold your absorbent material, then wrap it in breathable fabric that won’t stifle its absorbing capabilities. Installing bass traps alongside your soundproof foam can significantly enhance the acoustic quality of your space by reducing bass buildup and ensuring a clearer, more balanced sound.
Building Soundproofing Barriers (e.g., for Doors and windows)
To further enhance the soundproofing of your space, addressing noise leaks from doors and windows is essential. For doors, consider installing weather stripping around the frame and a door sweep at the bottom to block gaps. These simple additions can significantly reduce sound transmission through these common weak points. For windows, using acoustic caulk to seal gaps and investing in heavy, sound-dampening curtains can markedly decrease outdoor noise intrusion. Additionally, installing secondary glazing or using specially designed soundproofing window kits can offer a more robust solution for significant noise pollution. These measures, combined with your soundproof foam and bass traps, create a comprehensive soundproofing system for any room.
Installing Soundproofing on Ceilings
To extend your soundproofing efforts to the ceiling, understand that the process mirrors wall installations but requires extra attention due to gravity. Start by ensuring the ceiling surface is clean and smooth. If using adhesive glue, apply it sparingly and wait for it to become tacky. For foam panels, enlist help to hold them in place while you secure them, making sure to press firmly for optimal adhesion. Alternatively, using a combination of adhesive and mechanical fasteners can provide additional support, preventing the panels from sagging or falling over time. Remember, the key to effective ceiling soundproofing is a secure bond and seamless coverage, so take your time to measure, cut, and apply each panel with precision.
Maintenance and Care of Soundproof Foam
Keeping Your Panels Clean
To maintain the effectiveness and appearance of your soundproof foam panels, regular cleaning and dusting are essential. Use a soft brush or vacuum with a brush attachment to remove any buildup of dust or debris that can affect acoustic properties over time. If necessary, spot clean stains with mild detergent and water, taking care not to soak the foam. Allow the panels to dry completely before reattaching them to the wall.
Checking for Wear and Tear
It’s also crucial to regularly check your foam panels for any signs of wear and tear. Over time, adhesives can weaken, and foam can become compressed or damaged, reducing its soundproofing capabilities. Inspect the panels periodically and replace any that show significant wear or damage to maintain optimal soundproofing in your space. As a preventive measure, consider rotating the panels every few months to distribute wear more evenly and extend their lifespan.
Repairing Minor Damage
If you notice small tears or holes in your foam panels, don’t panic. These can be easily repaired with acoustic sealant or adhesive glue. Fill in the gap and smooth over the surface for a seamless finish. For larger damages, consider replacing the panel entirely to ensure continued soundproofing effectiveness.
Troubleshooting Common Installation Issues
Uneven Foam Placement
Uneven placement of soundproof foam can compromise the aesthetic look of your room and potentially affect its soundproofing efficiency. To correct this, carefully remove the panel, if possible, without damaging the foam or the wall. Reassess the starting point and use a level or laser guide to map out a precise alignment for the panels. Reapply the foam carefully, paying extra attention to maintaining straight lines and even spacing.
Gaps Between Panels
Gaps between panels not only diminish the effectiveness of your soundproofing but can also be visually distracting. If gaps are present, measure their width and cut small strips of foam to fill them in securely. For larger gaps, repositioning the adjacent panels might be necessary. Utilizing acoustic sealant to fill these gaps is another effective solution, ensuring that there are no breaches in your sound barrier.
Foam Panels Peeling Off the Wall
Foam panels peeling off can result from inadequate adhesive application or the use of a non-compatible adhesive. To remedy this, remove the panel and clean both the back of the foam and the wall surface of any residual adhesive. Apply a recommended adhesive more liberally, ensuring full coverage. Press firmly against the wall for an extended period, or consider temporarily supporting the panel in place until the adhesive fully bonds. If the problem persists, adding mechanical fasteners like nails or screws at the corners of the panels can offer additional security.
Foam Panels Peeling Off Ceiling
Similar to panels peeling off the wall, ceiling panels can also come loose due to poor adhesive application. However, the added element of gravity can make this issue more challenging to address. If possible, carefully remove the panel and clean both surfaces before reapplying with a generous amount of adhesive. Consider using additional mechanical fasteners for extra support, or consult a professional for assistance with securing ceiling panels securely.
Frequently Asked Questions
What tools do I need to install soundproof foam?
- You may need adhesive spray, double-sided tape, foam panels, a utility knife, and a measuring tape.
Where should I place soundproof foam for the best results?
- Install it on walls, ceilings, or doors where sound reflection is the highest, especially near noise sources.
Can I install soundproof foam without damaging the walls?
- Yes, use removable adhesive strips or command hooks to avoid permanent wall damage.
Does soundproof foam completely block noise?
- No, it reduces echo and absorbs sound but does not completely block outside noise.
Conclusion
In conclusion, mastering how to install soundproof foam effectively transforms your living or working space into a serene retreat, away from the cacophony of the outside world. Through the meticulous application of soundproofing barriers for doors and windows, the strategic placement of foam panels on walls and ceilings, and the ongoing maintenance and troubleshooting tips provided, you can achieve a markedly quieter environment.
This comprehensive guide not only navigates you through the initial installation process but also equips you with the knowledge to maintain and care for your soundproofing investments, ensuring their longevity and efficiency.
Whether you’re a novice looking to create a peaceful home office or a seasoned professional aiming for the perfect studio acoustics, the steps outlined in this post will pave the way to a successful soundproofing project. Remember, patience and precision are key to unlocking the full potential of your soundproof foam and reaping the benefits of a sound-protected space.