

Did you know that in an average American home, a wall light bulb burns out approximately every 1,000 hours? If you’re reading this post, chances are you’ve been left in the dark by a burnt-out bulb more than once.
This blog post is dedicated to illuminating you on the subject of “how to change a bulb in a wall light” – safely and efficiently. We’ll guide you through the key steps, from safely removing the old bulb to installing a new one, ensuring you’re never left fumbling in the dark. So, stay tuned, and let’s shed some light on this common household task!
Is It Safe to Change the Light Bulb?
Yes, changing a light bulb in a wall sconce is safe. However, you must take cautionary steps to ensure your safety. In particular, ensure the power is off before changing the bulb, and keep your hands away from any exposed wires.
Additionally, it would be best if you used the correct wattage of the bulb as specified for your sconce. Replacement bulbs are generally labeled with the bulb model number; match that number when purchasing a new one.
As long as you take the necessary safety precautions, changing a wall sconce bulb is straightforward and relatively easy.
What Will You Need?
- A new light bulb
- A ladder or step stool (depending on the height of your sconce)
- An oven mitt (for protecting your hands when handling a hot bulb)
Once you have the necessary supplies, you can begin replacing the bulb.
10 Easy Steps on How to Change Bulb in Wall Light
Step 1: Ensure Safety First
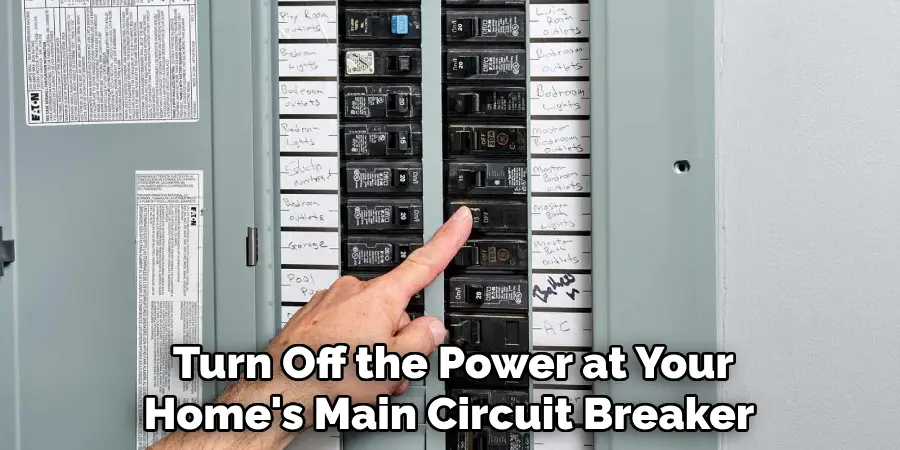
Before you begin, safety should be your top priority. Ensure the switch that controls the wall light is in the ‘off’ position. Better yet, go further and turn off the power at your home’s main circuit breaker. This will eliminate the risk of an electrical shock. Once you’ve done this, you’re ready to start changing the bulb in your wall light.
Step 2: Set Up Your Ladder or Step Stool
Place your ladder or step stool under the wall light. Make sure it is steady and safe to stand on. If someone can hold the ladder or stool while you are on it, that is an added safety measure.
Step 3: Remove the Light Cover
Depending on your type of wall light, you may need to remove a light cover or shade. Some fixtures have screws you’ll need to loosen, while others may require a slight twist to release the cover. Ensure that you handle the cover with care to avoid any damage. Once the cover is removed, you will see the bulb. If the bulb has been on recently, it may be hot, so use your oven mitt to protect your hand.
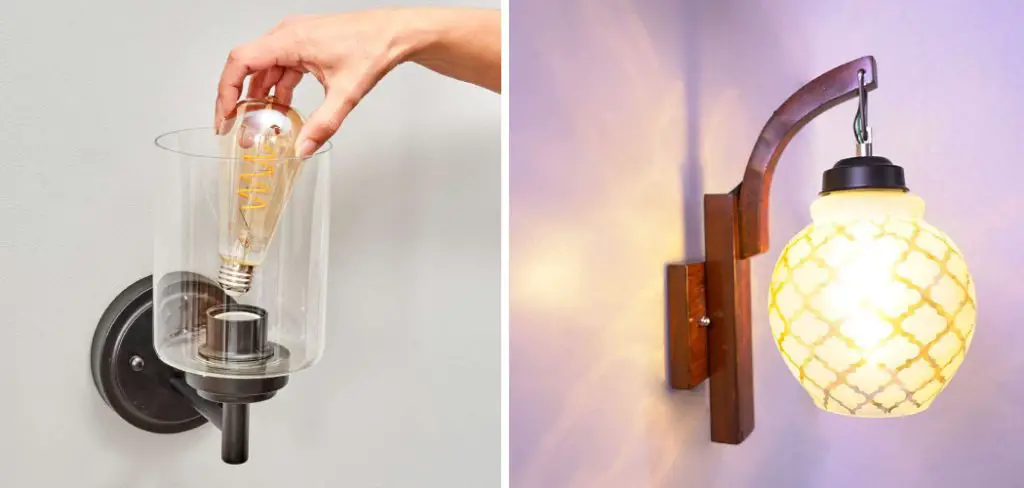
Step 4: Remove the Old Bulb
With your oven mitt on, carefully grip the bulb and gently turn it counterclockwise until it is completely unscrewed. If the bulb is stuck, try applying more pressure, but be careful not to break it. Once the bulb is loose, carefully pull it out of the socket. If the bulb is broken or shattered, be sure to clean up any glass fragments before continuing. Place the old bulb to the side in a safe location that won’t roll away or break.
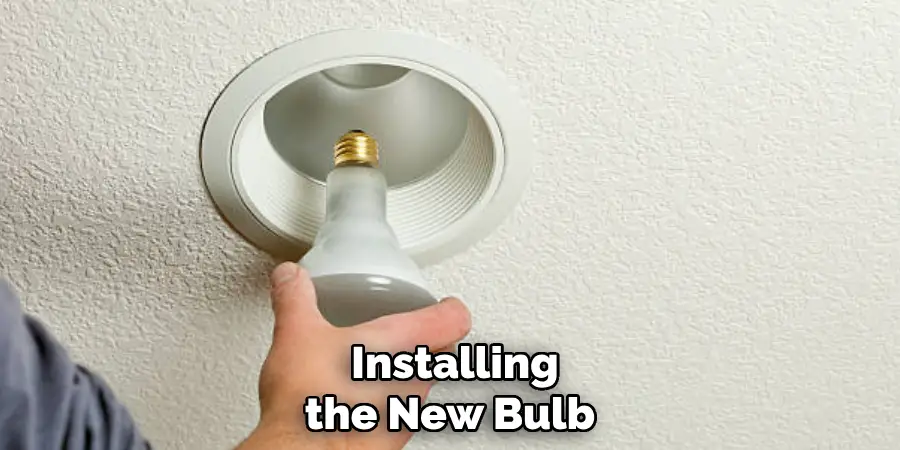
Step 5: Insert the New Bulb
Take your new bulb out of its packaging. With your oven mitt still on, insert the new bulb into the socket. Turn it clockwise until it is snug. Do not over-tighten the bulb, as this can cause damage.
Step 6: Replace the Cover
Once the new bulb is in place, it’s time to reattach the light cover or shade. Ensure it fits back onto the fixture correctly, and secure any screws if necessary. Otherwise, just slightly twist the cover until it is snugly in place.
Step 7: Test Your Light
With the light cover in place and the new bulb installed, it’s time to test your light. Before you climb down from your ladder or step stool, flip the light switch to the ‘on’ position to check if the bulb works. If the bulb does not light up, ensure it is screwed in correctly and try again.
Step 8: Clean Up
Ensure you clean up once you have confirmed that your new bulb is working correctly. Dispose of the old bulb safely and put away your ladder or step stool. Use a dry cloth to wipe down the wall light fixture.

Step 9: Turn Back On The Power
If you turned off the power at your circuit breaker, remember to turn it back on now! Be careful when flipping the switches so you don’t cause any sparks or short circuits. Check that all the outlets you previously turned off are working correctly.
Step 10: Celebrate!
Congratulations, you have just successfully changed a bulb in your wall light fixture! Pat yourself on the back for a job well done, and enjoy the beautiful new look of your wall sconce. Changing bulbs in wall lights doesn’t have to be complicated or intimidating, and you can now proudly add this task to your list of DIY home projects!
Now that you know how to change a bulb in wall light fixtures, you’ll be ready the next time it’s needed. With these simple steps and safety tips in mind, you’ll be a pro in no time. Start tackling that lighting maintenance with confidence!
Choosing the Right Bulb for Your Wall Light
When choosing the right bulb for your wall light, understanding the aspects of wattage, compatibility, bulb types, and color temperature is critical.
Understanding Wattage and Compatibility
The wattage of a bulb is a measure of its power consumption and brightness. It’s essential to select a bulb with the same or lower wattage as the one being replaced to avoid damaging your light fixture or posing a fire risk. Compatibility also extends to the bulb’s base – make sure the new bulb’s base matches the socket in your fixture.
Different Types of Bulbs
There are several types of bulbs available, each with their pros and cons:
- LEDs: These bulbs are energy-efficient, durable, and have a longer lifespan. However, they can be more expensive upfront.
- Incandescent: These are the traditional bulbs we are most familiar with. They provide warm light and are inexpensive but have a shorter lifespan and consume more energy.
Considering Color Temperature for Desired Ambiance
Color temperature, measured in Kelvins, can affect the ambiance of your room. Lower Kelvins yield a warm, cozy light, while higher Kelvins result in a cool, more energetic light. Choose a bulb with a color temperature that suits your desired ambiance.
In conclusion, understanding these aspects will help you choose the right bulb for your wall light, ensuring not only the proper operation and safety of your fixture but also the creation of your desired atmosphere.
Troubleshooting Tips: When Things Don’t Go as Planned
Bulb Won’t Screw in Properly
If your new bulb doesn’t screw in properly, there may be an issue with the socket. Ensure the power is off, and then gently wiggle or rotate the socket to loosen any debris or corrosion that may be preventing the bulb from fitting correctly.
Bulb Blows Out Immediately After Installing
This could be a sign of a faulty bulb or an electrical issue. Try using a different, compatible bulb to see if the problem persists. If it does, consult an electrician.
Light Fixture Doesn’t Turn On
If your light fixture doesn’t turn on after installing the new bulb, double-check that the power is turned on and that the bulb is installed correctly. If the issue persists, there may be an underlying electrical problem that requires professional assistance.
In any situation, always prioritize your safety and consult a professional if needed. With these tips in mind, you can confidently change the bulb in your wall light fixture with ease.
Upgrading to Energy-Efficient Lighting
Switching to energy-efficient lighting, such as LEDs, is a simple yet highly effective way to reduce energy consumption and costs while also positively impacting the environment.
Benefits of Switching to LED Bulbs
LED bulbs, while more expensive initially, offer significant advantages over traditional incandescent bulbs. They last up to 25 times longer and consume 75% less energy, saving you money in the long run. They also deliver high-quality light instantly and are available in various colors and brightness levels, allowing you to create the perfect ambiance for your space.
Steps for Retrofitting Your Wall Light for Energy Efficiency
Retrofitting your wall light to accommodate LED bulbs involves the following steps:
- Safety First: As always, begin by switching off the power supply to avoid any potential electrical hazards.
- Remove the Old Bulb: Unscrew the existing incandescent bulb from your fixture.
- Check the Fixture: Ensure that your fixture is compatible with LED bulbs. This usually involves checking the fixture’s wattage and socket type.
- Install the LED Bulb: Screw your new LED bulb into the socket and ensure it fits correctly.
- Test the New Bulb: Switch the power back on and test your new LED bulb to ensure it’s working correctly.
Long-Term Cost Savings and Environmental Impact
Though the upfront cost of LED bulbs is higher, the long-term savings are substantial due to their low energy consumption and long lifespan. Over time, the cost savings can add up to hundreds or even thousands of dollars.
Moreover, by switching to LEDs, you’re doing your part to reduce carbon emissions and combat climate change. LEDs consume significantly less energy than incandescent bulbs, which means less energy is needed from power plants, leading to a reduction in greenhouse gas emissions.
In conclusion, by upgrading to energy-efficient lighting, you’re not only making a smart financial decision but also contributing to a more sustainable and environmentally friendly future.
Enhancing the Aesthetics of Your Wall Lights
Your selection of wall lights can dramatically change the overall feel and ambiance of your room. Here are some creative ways to enhance the aesthetics of your light fixtures and achieve varied effects:
Using Different Types of Bulbs for Varied Effects
Experimenting with different types of bulbs can create a variety of lighting effects. For instance, tinted or colored bulbs can create an unexpected and playful effect. Vintage-style Edison bulbs, with their warm glow and visible filaments, can add a retro or industrial vibe to your space. The shape of the bulb, such as globe or candle-style bulbs, can also contribute to a light fixture’s overall appeal.
Incorporating Accessories or Shades for a Personalized Touch
Accessorizing your wall lights with shades or covers can add a personalized touch. Lampshades come in various shapes, materials, and colors, allowing for extensive customization. A simple white shade can give a clean, minimalist look, while a patterned or colored shade can make a bold statement and become a focal point in your room. Additionally, using light diffusers or decorative covers can soften the light and create interesting shadow patterns on the walls.
Remember, the choice of accessories should align with your room’s overall decor theme for a harmonious look. With these creative ideas, you can transform your wall lights from a mere light source to a key element of your room’s design.
Maintaining a Routine Light Fixture Check-Up
Regular inspection and maintenance of your wall lights can extend their lifespan, enhance their performance, and prevent minor issues from turning into major problems.
Establishing a Regular Schedule for Inspecting Your Wall Lights
Set up a routine, such as a biannual or annual schedule, to inspect your wall lights. This routine should involve checking for typical issues like loose bulb fittings, irregular brightness, flickering, or burnt-out bulbs. This consistent check-up allows you to identify and rectify any problems at the earliest possible stage.
Cleaning and Preventive Maintenance Tips
Environmental factors like dust and dirt can affect the performance of your light fixtures. Regular cleaning, using a dry cloth or a vacuum with a brush attachment, can help maintain the brightness and efficiency of your wall lights.
When replacing bulbs, ensure the power is off and the bulbs have cooled down. Consider wearing gloves to prevent oils from your skin from damaging the new bulb. It’s also a good practice to regularly check your wall light fixtures for signs of wear and tear or electrical issues like exposed wires or loose connections.
Addressing Issues Before They Become Major Problems
Preventive maintenance involves prompt action at the first sign of any issue. If a bulb is flickering, replace it. If the light emitted seems dimmer than usual, clean the fixture and bulb. For any signs of electrical problems, it’s always best to consult a professional. Remember, addressing minor issues early can prevent them from becoming major, more costly repairs in the future.
By maintaining a regular check-up routine, you’ll keep your wall lights functioning optimally and safely while helping to maintain the desired atmosphere in your space.
Safety Measures for DIY Lighting Projects
It’s important to prioritize safety when undertaking any do-it-yourself lighting projects. Here are some key safety measures to follow:
Importance of Turning Off Power Before Any Maintenance
Before beginning any installation, adjustment, or maintenance of lighting fixtures, always ensure that the power supply is switched off. This crucial step helps prevent the risk of electric shock, safeguarding you from potential injury. Remember, it’s better to be safe than sorry.
Handling Electrical Components Safely
When you’re working with electrical components, it’s important to handle them with care. Avoid touching the metal parts of the sockets, switches, or bulbs with bare hands, and use tools with insulated handles when necessary. If you need to replace a bulb, make sure it has cooled down before handling it. Always wear gloves to protect your hands and to prevent the oil from your skin from damaging the bulb.
Knowing When to Call a Professional Electrician
While many lighting tasks can be done on your own, some require the expertise of a professional electrician. If you encounter complex wiring issues, see exposed wires, or experience recurring problems like flickering lights or irregular brightness, it’s time to call a professional. Trying to fix these issues yourself can lead to further damage and potential safety risks. Recognizing your limits and knowing when it’s time to call in the pros is an essential aspect of DIY project safety.
By adhering to these safety measures, you can ensure that your DIY lighting projects are completed safely and effectively.
5 Additional Tips and Tricks
- Always ensure your safety first. Before you change the bulb in the wall light, make sure to switch off the electricity supply. This will prevent any accidental shocks.
- Use the correct bulb. Always check the wattage of the existing bulb and replace it with one of the same or lower wattage.
- Handle the bulb correctly. When removing and installing the new bulb, handle it by the base to avoid damaging it.
- Check the light fixture. Before installing the new bulb, ensure the light fixture is clean and dust-free.
- Test the new bulb. After installation, switch the electricity supply back on and test the new bulb to ensure it works correctly.
With these tips and tricks in mind, changing the bulb of a wall light should be easy and hassle-free. All that is left is to enjoy your newly illuminated space!
5 Things You Should Avoid
- Never use a higher-wattage bulb than the one being replaced. This can damage the light fixture and cause a fire hazard.
- Do not touch the bulb with bare hands. The oils from your skin can shorten the bulb’s life or even make it explode when switched on.
- Avoid over-tightening screws while installing the new bulb. Too much pressure can cause the bulb to break.
- Never force a bulb into the socket. If it fits easily, the wattage may be compatible, and a different bulb needs to be found.
- Do not leave foreign objects in the light fixture when changing the bulb. This can lead to electrical malfunctions and potentially start a fire.
Avoiding these common pitfalls will help ensure that you successfully change the bulb in your wall light safely and effectively. With a little bit of preparation, you can have your space illuminated in no time!
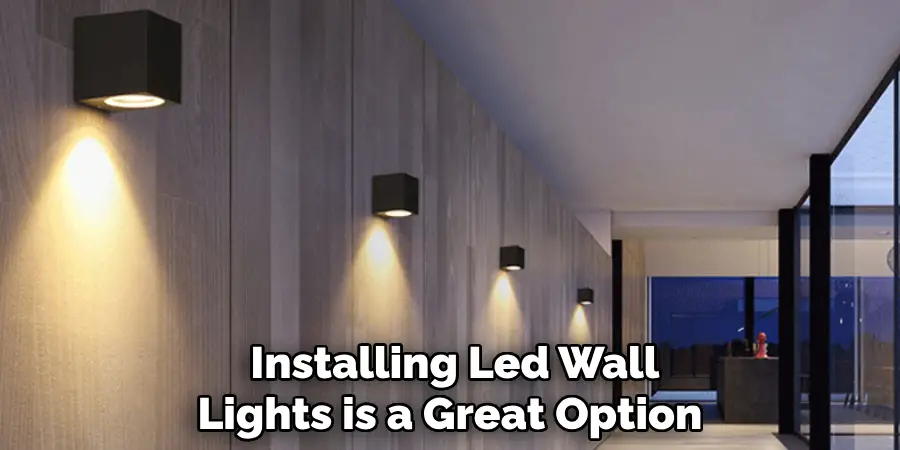
How Does an LED Wall Light Work?
LED wall lights use light-emitting diodes (LEDs) to produce light. LEDs are semiconductors that convert electrical energy into visible light. When an electrical current passes through the diode, electrons move and create energy transfer in the form of photons. The color of the light produced by the LED depends on its temperature – with warmer colors having a lower temperature and cooler colors having a higher temperature.
LED wall lights are incredibly efficient, producing more light with less electricity than traditional lighting methods like incandescent bulbs. They also last significantly longer, providing up to 25 times the life expectancy of incandescent bulbs.
If you want a cost-effective and energy-efficient way to illuminate your space, installing LED wall lights is a great option. With their long life span and low energy usage, these bulbs are an excellent investment in any home or business.
Conclusion
After completing the steps, your wall light shines bright and is ready to complete any task. Completing DIY projects at home can be a fun and rewarding experience, with the pride that comes from a well-constructed project. Not only will you save money, but you can also customize your lighting to fit your needs, whether for aesthetic or functional purposes.
Remember to pay attention to detail and safety while performing any electrical work in your home – you don’t want to risk injury or damage to the wall unnecessarily! And most importantly, enjoy the satisfaction of what you’ve accomplished. With basic knowledge and a few steps, do-it-yourself lighting changes are quick and easy!
Hopefully, the article on how to change bulb in wall light helped guide you through the process. Now that you know the basics, go forth and easily conquer any lighting maintenance tasks! Good luck!